
Self-healing mechanisms have emerged as a game changer in the realm of software testing, where precision and reliability are critical. Self-healing in test automation refers to the ability of an automated testing framework or tool to identify and rectify test script failures without human intervention. It’s like having an intelligent system that can detect issues during test execution and take corrective actions on its own.
One of the most significant barriers to implementing a continuous testing strategy is that automated tests are frequently flaky and fail. Frequent code changes in web/UI object locators such as ID, Name, XPath, CSS locator, class, tag, link text, or partial link text, etc. wreak havoc on automated scripts. False positives are flaky test failures because there is no impact on functionality and everything works as expected, yet the tests fail owing to unstable locators. Test maintenance must be minimized in order for continuous testing and integration to be successful. To overcome such a hurdle, the self-healing approach in test automation plays a significant role.
In this Post
What is a self-healing mechanism?
A self-healing mechanism can be understood as an automation for test automation. It’s a technique for maintaining automated tests by utilizing AI and machine learning. To ensure that the test maintains its functionality, automatic adjustments are applied after identifying changes made to the application. For example, when your script is unable to locate its default locator, it will continue to explore for additional options. As a result, instead of failing due to an element not found exception, our test execution will continue.
Self-healing is critical since it can considerably minimize the test automation maintenance burden. Changes in the application under test can cause test scripts to become brittle, and self-healing technologies can help test scripts adapt to these changes easily. This leads in fewer false positives and more reliable tests.

How does self-healing work?
The following steps are involved in the self-healing process:
- Identify Failure: The self-healing mechanism recognizes the type of failure, such as a missing element or altered properties.
- Adapt or Retry: Depending on the specified rules or algorithms, the mechanism may try to adapt to the change by altering the element location, or it may retry the action.
- Retry Count: To prevent infinite loops, the number of retry attempts may be limited.
- Logging: Detailed logs are kept to describe the element identification failure, the recovery procedures, and the results.
- Verification: The self-healing mechanism checks to see if the issue has been resolved by determining whether the element is now accessible.
If the recovery is successful, the test script continues execution. If not, it may either repeat the recovery attempt or report a failure.
Implementing Self-Healing
Create more robust and resilient tests with dynamic element locators.
- XPath and CSS Selectors: Instead of relying on fixed attributes like IDs or names, XPath and CSS selectors can be used to locate elements based on their position within the HTML structure or their attributes’ partial matches.
- Relative Locators: Some test automation frameworks offer relative locators that allow you to locate elements relative to other nearby elements. For example, you can locate an element that is below or next to another element.
- Regular Expressions: Regular expressions can be employed to match partial or changing attribute values when searching for elements.
- Custom Attributes: Adding custom attributes to elements that remain static can provide a stable way to identify related dynamic elements.
- Waiting Mechanisms: Implementing waiting mechanisms, such as explicit waits, allows your test scripts to wait for an element to become available or meet specific conditions before interacting with it. This is especially useful when dealing with elements that load dynamically.
- Page Object Models: Using the Page Object Model (POM) design pattern in test automation separates the page’s structure and element locators from the test script. When elements change, you only need to update the page object, keeping your test scripts relatively unchanged.
- Dynamic Element Identification Libraries: Some testing libraries or tools provide built-in support for dynamic element identification, using algorithms and heuristics to find and interact with elements even if their attributes change.
Retry mechanisms.
You may improve the resilience of test automation scripts and lessen the effect of intermittent failures by introducing retry methods, resulting in a more dependable and stable system overall. However, retry systems must be carefully configured to avoid excessive resource use or infinite retry cycles, and they must be monitored for effectiveness and performance.
A retry mechanism can be used when engaging with a web application to click a button or submit a form numerous times if the initial attempt fails due to delayed page loading or intermittent network troubles.
AI and machine learning algorithms
AI and ML are powerful tools that enable systems to learn, adapt, and make data-driven decisions. AI can assist in self-healing test automation by automatically adapting to changes in the application under test.
Self-Healing and Selenium
Selenium itself does not have built-in self-healing features, but you can implement self-healing mechanisms using Selenium in combination with other libraries or approaches.
“Healenium” is a testing tool and framework that specializes in self-healing test automation for web applications.
Integrating Healenium into your Selenium-based test automation framework involves a few steps. Below, I’ll outline a general process for integrating Healenium into your existing Selenium tests using Java as an example:
To use Healenium, you need to include its dependencies in your project. You can do this by adding the following Maven dependency to your project’s pom.xml file:
   <dependency>
       <groupId>com.qameta.healenium</groupId>
       <artifactId>healenium-webdriver</artifactId>
       <version>2.1.0</version> <!-- Use the latest version available -->
   </dependency>
Ensure that you update the version number to the latest available version.
In your test code, replace the standard WebDriver initialization with Healenium’s HealeniumDriver initialization. Healenium provides a wrapper around the standard Selenium WebDriver to enable self-healing capabilities.
   import com.qameta.healenium.HealeniumDriver;
   import org.openqa.selenium.WebDriver;
   import org.openqa.selenium.chrome.ChromeDriver;

   // Set up the WebDriver with Healenium
   WebDriver driver = new HealeniumDriver(new ChromeDriver());
Healenium provides various configuration options that you can customize to suit your needs. For example, you can configure retry settings, self-healing thresholds, and more. Here’s an example of configuring Healenium options:
   import com.qameta.healenium.HealeniumDriver;
   import com.qameta.healenium.configuration.HealeniumConfiguration;
   import org.openqa.selenium.WebDriver;
   import org.openqa.selenium.chrome.ChromeDriver;

   // Create a HealeniumConfiguration
   HealeniumConfiguration healeniumConfig = HealeniumConfiguration.builder()
           .threshold(0.8) // Adjust the self-healing threshold as needed
           .build();

   // Set up the WebDriver with Healenium and the configuration
   WebDriver driver = new HealeniumDriver(new ChromeDriver(), healeniumConfig);
Once you’ve initialized the Healenium WebDriver, you can use it like any other Selenium WebDriver in your test scripts. Healenium will automatically perform self-healing when necessary.
   // Example: Navigate to a web page and perform actions
   driver.get("https://example.com");
   driver.findElement(By.id("username")).sendKeys("your_username");
   driver.findElement(By.id("password")).sendKeys("your_password");
   driver.findElement(By.id("loginButton")).click();
With Healenium integrated, run your tests as usual. Healenium will handle element identification and self-healing when it encounters issues.
Self-Healing and Katalon
Katalon has an inbuilt mechanism of self-healing. If enabled, it will help us to reduce the flakiness of the test cases.
If Katalon is unable to find the default locator of a web object, it will keep locating the object with its pre-configured alternative locators. This will keep the test execution seamless.
Self Healing is enabled in Katalon Studio by default.
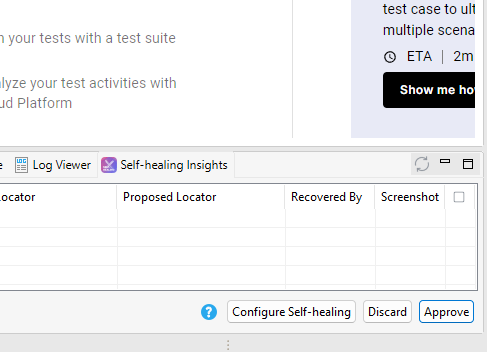
Click on “Configure Self-Healing” button at the bottom right under the Self-Healing tab and select the “Enable Self-Healing execution”
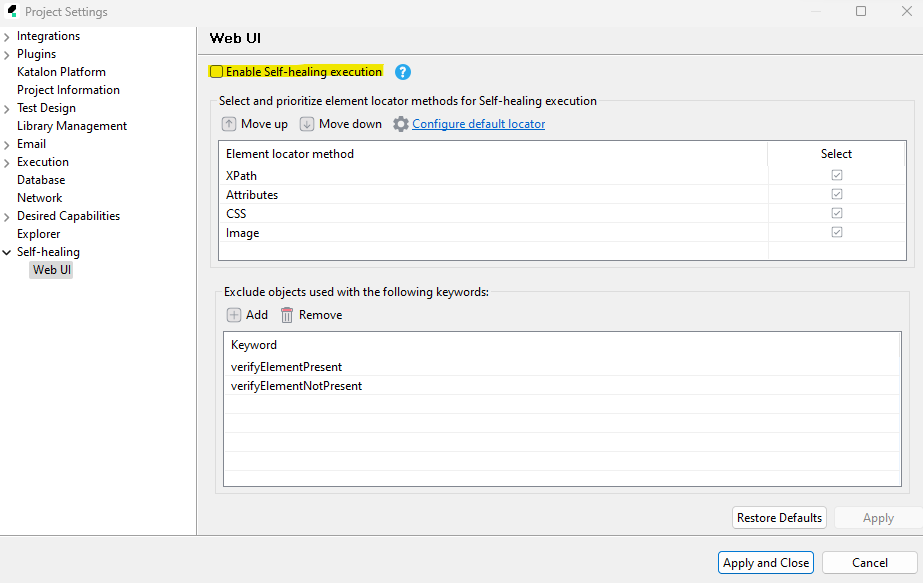
By simply selecting and unchecking the checkboxes, one can choose to employ one or more element location methods. We may also change the order of the various techniques by dragging them up and down. Priority is the order in which Katalon Studio will search for an alternative.
For example, if Katalon Studio fails to recognise the default locator of some web object, it will start looking in the following order.
First, it will look for the relative XPath. If it is successful in locating the alternative Xpath, it will continue execution and later suggest replacing the default XPath with an alternative one. If it fails to locate an object by the XPath, Katalon will move to attributes, then CSS and lastly image.
Conclusion : Self-healing in test automation is a significant notion that can improve the robustness and reliability of your automated tests. As technology advances, we may expect more novel self-healing solutions to emerge, increasing the reliability of automated testing.
Stay tuned for more insights into the world of test automation!