Here is our attempt to create a brief, very short version to summarize and touch upon all concepts of Selenium. This Quick Refresher Guide will certainly help you to refresh your Selenium concepts. We hope that you will enjoy reading through this.
This can also be used as a reference guide for preparing for interviews when you quickly need to brush up on the concepts. Do not forget to let us know your feedback and if you want more to add to this. You may want to refer to our earlier post on Selenium Interview Questions.
In this Post
Introducing Selenium
Selenium is one of the most powerful automation tools available today. Using Selenium one can easily automate the test scripts for Web applications across different browsers and platforms. It’s an open-source tool and completely free.
Why Selenium?
- Selenium is an open-source tool, with no cost involved
- Flexibility to use and execute on various operating systems and browsers
- Supports mobile devices
- Can execute tests while the browser is minimized
- Can execute tests in parallel
Limitations
- Selenium support only web-based applications, it doesn’t support any windows-based applications
- Using Selenium tool alone mobile applications cannot be tested, with the use of Appium we can achieve it
- The Windows-based popup cannot be tested using Selenium alone we need to use Auto IT to handle the windows-based popups
- Selenium doesn’t have inbuilt reporting capability so JUnit/ TestNG need to use
- Limited support for image testing
- Selenium IDE supports only Firefox browser
- Selenium doesn’t have a built-in object repository
- Selenium is an open-source so no reliable support is available
History of Selenium

Updated November 24, 2021: Latest Version of Selenium 4 has been released on October 13, 2021.
Components of Selenium
 Selenium IDE
![]() Selenium RC
Selenium RC
 Selenium Grid
 Selenium WebDriver
Selenium IDE
Open source record and playback test automation for the web. It was introduced as an add-on for the Firefox browser. We have IDE available for Chrome as well now.
- Ready to use IDE
- Simple, turn-key solution to quickly author reliable end-to-end tests. Works out of the box for any web app
- Easy debugging with breakpoints and pausing on exceptions
- Cross-browser and parallel executions
Checkout other available IDEs for Selenium to use with Java
Selenium RC
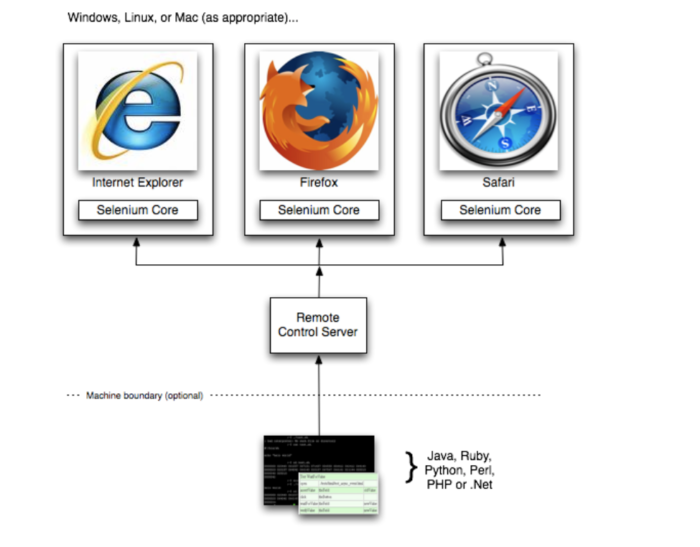
A testing framework that enables a QA or a developer to write test cases in any programming language in order to automate UI tests for web applications against any HTTP website.

- The RC server injects a JavaScript program known as Selenium Core into the browser
- Once the Selenium Core program is injected, it starts receiving instructions from the RC server based on test scripts
- The web browser executes all the commands given by Selenium Core and returns the test summary back to the server
Selenium Grid
To run the test scripts in multiple test environments across different browsers, Operating Systems and machines in parallel. The system where script gets executed is called as a hub, and the execution that takes place in different machines are called as nodes. It is very helpful for performance testing as well.
Selenium WebDriver
A collection of APIs which are used to automate the test scripts for web applications. Selenium Webdriver is platform-independent since the same code can be used on different Operating Systems like Microsoft Windows, Apple OS and Linux. Selenium WebDriver performs much faster as compared to Selenium RC because it makes direct calls to the web browsers. RC on the other hand needs an RC server to interact with the browser.
Selenium WebDriver was first introduced as a part of Selenium v2.0. The initial version of Selenium i.e Selenium v1 consisted of only IDE, RC and Grid. However, with the release of Selenium v3, RC has been deprecated and moved to the legacy package.
WebDriver Different with Selenium RC
Selenium RC
- Selenium RC was written purely in JavaScript
- The JavaScript, in Selenium RC, would then emulate user actions
- Automate the browser from within a browser
Selenium WebDriver
- Controls the browser from outside the browser
- uses accessibility API to drive the browser
WebDriver Architecture
Selenium API
- helps in communication between languages and browsers
- Each and every browser has different logic of performing actions on the browser

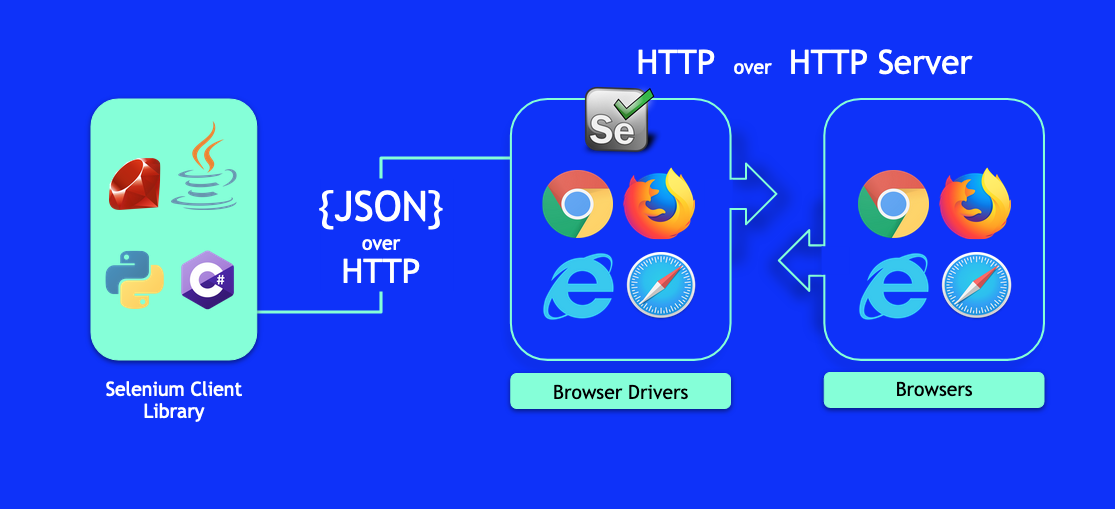
Language Bindings or Client Library
- Collection of Jar files with supported language bindings to generate automation scripts
- Supported languages – Java, C#, Ruby, Python, Perl
JSON Wired Protocol
JavaScript Object Notation
- Works as a transport mechanism
- is able to transport all the necessary elements to the code that controls it
- It is a REST (Representational State Transfer) API
- facilitates the capability of transferring the data between the Client and Server on the web
Browser Drivers
- Interacts with browsers and relaying automation script instructions to the browsers
- Each browser has their own specific Browser Web Drivers
Here is how it works:
- HTTP request gets generated for every Selenium command and sent to browser driver
- Specific browser driver receives the HTTP request through the HTTP server.
- HTTP Server sends all the steps to perform a function which are executed on the browser.
- Test execution report is sent back to server and HTTP server sends it to the Automation script.
- HTTP Server sends all the steps to perform a function which are executed on the browser.
- Specific browser driver receives the HTTP request through the HTTP server.
Browsers
Every browser has specific web drivers to execute automation scripts
Selenium supports all major web browsers – internet explorer, firefox, safari, Chrome
Browser Specific Web Drivers
- Chrome Driver
System.setProperty("webdriver.chrome.driver", "Local Driver Path");
driver=new ChromeDriver();
- Firefox Driver
System.setProperty("webdriver.gecko.driver", "Local Driver Path");
driver= new FirefoxDriver();
- Internet Explorer Drive
System.setProperty("webdriver.ie.driver","Local Driver Path");
driver = new InternetExplorerDriver();
- HTML Unit
WebDriver driver = new HtmlUnitDriver();
HTMLUnit Driver is available under Apache License 2.0 and can be downloaded from https://github.com/seleniumhq/htmlunit-driver.
Page Object Model
The Page Object model is also known as POM is an object design pattern in Selenium, which helps in maintaining code and avoiding code duplication. In POM, web pages are represented as classes, and the various elements on the page are defined as variables of the class. All possible user interactions can then be implemented as methods in the class.
- Helps to make the code clean, easy to understand, optimized and reusable
- Object Repository is independent of test cases; same object repository can be used for different purposes with a different tool
Using Page Factory with Page Object
Page factory is the extension of Page Object Model with which you can initialize the elements of the Page object or instantiate the Page object itself.
- allows decorating WebElement variables in the Page objects so that we remove a lot of the lookup code
- elements get initialized with PageFactory .initElements() call
Locators
Selenium identifies elements on a page using Locators. Selenium provides a number of locators to identify correct elements on a page.
- ID
- Commonly used locator
- Unique for each element
WebElement elementName = driver.findElement(By.id(“ID of element”));
Name
- Same as using ID locator
- Not unique on the page
WebElement elementName = driver.findElement(By.name(“Name of Web element”));
Class Name
- Returns elements matching the attribute name “class”
WebElement elementName = driver.findElement(By.className(“element class”));
Tag Name
- Helpful to extract the content within tag
WebElement elementName = driver.findElement(By.tagName(“TAG NAME”));
Link Text
- Returns links with specific text in hyperlink
WebElement elementName = driver.findElement(By.linkText(“Hyperlink TEXT”));
Partial Link Text
- Find link with a part of the text in a hyperlink
WebElement elementName = driver.findElement(By.partialLinkText(“partial text of Hyperlink”));
XPath
- Returns elements based on the XPath provided
WebElement elementName = driver.findElement(By.xpath(“XPATH”));
CSS Selector
- Best way to locate elements on the page
- Find elements using CSS attributes, id, class
WebElement elementName = driver.findElement(By.cssSelector(tag#id));
WebElement elementName = driver.findElement(By.cssSelector(tag.class));
WebElement elementName = driver.findElement(By.cssSelector(tag[attribute.value]));
WebElement elementName = driver.findElement(By.cssSelector(tag.class[attribute.value]));
Finding Elements
One can find element(s) on the page using WebDriver by their ID, name, className, XPath, and link
- Easiest helper method
- Two separate methods to find the element and multiple elements- i.e findElement and find elements
findElement Command: returns a web element object
WebElement elementName = driver.findElement(By.LocatorType("LocatorValue"));
The locator can be any of the below
- ID
- Name
- Class Name
- Tag Name
- Link Text
- Partial Link Text
- XPath
findElements Command: returns a list of web elements
List<WebElement> elementName = driver.findElements(By.LocatorType("LocatorValue"));
Waiting for Elements
Two types of waits are available in WebDriver
Implicit Waits: used to provide default waiting time between each consecutive step in the entire script. It’s a simple and single line of code that goes in the setup method. It extends the execution time as the default wait applies to the entire script.
Import package to use Implicit wait
import java.util.concurrent.TimeUnit
drv.manage().timeouts().implicitlyWait(10, TimeUnit.SECONDS);
Explicit Waits: Explicit waits are used to halt the execution until the time a particular condition is met or the maximum time has elapsed.
import org.openqa.selenium.support.ui.ExpectedConditions
import org.openqa.selenium.support.ui.WebDriverWait
WebDriverWait wait = new WebDriverWait(drv,30);
Handling Elements on Page
Input to Text Boxes
Use the sendKeys() method to enter values, passwords, texts into TextBoxes.
e.g. enter the user name on a login form
WebElement txtuser = driver.findElement(By.id(“username”));
txtuser.sendKeys(“automated-360”);
Delete values from Text Box
Use clear() method to delete the text from the text box
txtUser.clear()
Check Box and Radio Buttons and Links
Use the click() method to click on the link/Check box/radio and wait for the page to load.
lnkTerms.Click()
Select Value from Dropdowns
Use below methods. Need to import Select UI package before using these
Import org.openqa.selenium.support.ui.Select;
selectByVisibleText()/deselectByVisibleText(): Selects the option displayed as per the argument passed with exact text on screen
selectByValue/deselectByVale: Selects/deselects options by its value
selectByIndex()/deselectByIndex(): Selects/deselects the option at the given index.
isMultiple():Returns TRUE if the drop-down element allows multiple selections at a time; FALSE if otherwise.
deSelectAll(): Clears all selected entries.
Click on Button
Use click() method . alternatively, you can also use submit() method to submit the entire form
e.g. click submit button on the login form
WebElement btnSubmit = driver.findelement(By.id(
“submit”));
btnSubmit.click();
Mouse Events
- Use Advanced User Interaction API
- Import Action and Actions class
import org.openqa.selenium.interactions.Action;
import org.openqa.selenium.interactions.Actions;
Some of the commonly used operations
- doubleClick() – Performs a double-click at the current mouse location.
- dragAndDrop(source, target) – Performs click-and-hold at the location of the source element, moves to the location of the target element, then releases the mouse.
Parameters:
source- element to emulate button down at.
target- element to move to and release the mouse at. - contextClick() – Performs a Right click at the current mouse location.
Keyboard Events
- Use Advanced User Interaction API
- Import Action and Actions class
import org.openqa.selenium.interactions.Action;
import org.openqa.selenium.interactions.Actions;
Some of the commonly used operations
- sendKeys(onElement, charsequence) Sends a series of keystrokes onto the element.
Parameters:
onElement – element that will receive the keystrokes, usually a text field
charsequence – any string value representing the sequence of keystrokes to be sent
- keyUp(modifier _key) Performs a key release.
Parameters:
modifier_key – any of the modifier keys (Keys.ALT, Keys.SHIFT, or Keys.CONTROL)

TestNG is a testing framework for the Java programming language created by Cédric Beust. The design goal of TestNG is to cover a wider range of test categories: unit, functional, end-to-end, integration, etc., with more powerful and easy-to-use functionalities.
- NG Stands for Next Generation
- Inspired by Junit which uses annotations
Why TestNG in Selenium
TestNG has lots of features that make the test automation easier
- Its Open Source
- Customizable test configuration
- Organize and understand the test easily
- Data-driven Testing
- Parallel Testing
- Excellent Reporting feature
- Generate Logs
Annotations
Annotations are used to provide more details or descriptions or supplement information about a program or business logic.
- Annotations start with ‘@’
- Annotations do not change the action of a compiled program
- Annotations help to associate metadata (information) to the program elements i.e. instance variables, constructors, methods, classes, etc
- Annotations are not pure comments as they can change the way a program is treated by the compiler
Annotations Available in TestNG
@BeforeSuite: The annotated method will be run before all tests in this suite have run.
@AfterSuite: The annotated method will be run after all tests in this suite have run.
@BeforeTest: The annotated method will be run before any test method belonging to the classes inside the <test> tag is run.
@AfterTest: The annotated method will be run after all the test methods belonging to the classes inside the <test> tag have run.
@BeforeGroups: The list of groups that this configuration method will run before. This method is guaranteed to run shortly before the first test method that belongs to any of these groups is invoked.
@AfterGroups: The list of groups that this configuration method will run after. This method is guaranteed to run shortly after the last test method that belongs to any of these groups is invoked.
@BeforeClass: The annotated method will be run before the first test method in the current class is invoked.
@AfterClass: The annotated method will be run after all the test methods in the current class have been run.
@BeforeMethod: The annotated method will be run before each test method.
@AfterMethod: The annotated method will be run after each test method.
@DataProvider: Marks a method as supplying data for a test method. The annotated method must return an Object[][] where each Object[] can be assigned the parameter list of the test method. The @Test method that wants to receive data from this DataProvider needs to use a dataProvider name equal to the name of this annotation.
@Factory: Marks a method as a factory that returns objects that will be used by TestNG as Test classes. The method must return Object[].
@Listeners: Defines listeners on a test class.
@Parameters: Describes how to pass parameters to a @Test method.
@Test: Marks a class or a method as part of the test.


Excellent info regarding Selenium. Thanks
[…] code won’t run! This is frustrating.. Many of them, end up quitting to proceed further with Java and Selenium. if you are facing this issue and you landed up to this post, you are right, you just have missed […]